Rushing your floor's cure time by just twelve hours can strip twelve years off its lifespan and put your entire operation at risk of a health code shutdown. If you are managing a high-volume facility, then you already know that every hour your doors are closed represents a painful hit to your bottom line. It's frustrating to deal with conflicting advice about when your staff can actually get back to work. Understanding the specific commercial kitchen flooring installation timeline is the only way to protect your investment and ensure your new surface meets the 0.50 DCOF slip resistance standards while standing up to thermal shock.
You deserve a floor that reflects the same level of professional craftsmanship you put into your menu, not a coating that fails the first time a boiling stockpot hits the ground. This guide breaks down exactly what to expect from the initial concrete grind to the final chemical cure. We will walk through a predictable day-by-day schedule that meets 2026 USDA and FDA standards, combining industrial strength durability with a clean, high-end finish. By the end of this article, you'll have the clarity needed to plan your reopening with total confidence and zero guesswork.
Key Takeaways
- Map out a realistic commercial kitchen flooring installation timeline to avoid the "24-hour myth" and prevent costly coating delamination.
- Compare urethane cement, epoxy, and polished concrete to identify which material delivers the fastest turnaround without sacrificing industrial strength.
- Review a detailed five-day sequence for a typical 2,000-square-foot space to coordinate your reopening with surgical precision.
- Explore phased installation strategies designed to minimize operational downtime, ensuring your facility remains functional even during major upgrades.
- Learn how professional preparation and proper cure times guarantee compliance with 2026 USDA and FDA safety standards.
The High Stakes of Your Commercial Kitchen Flooring Timeline
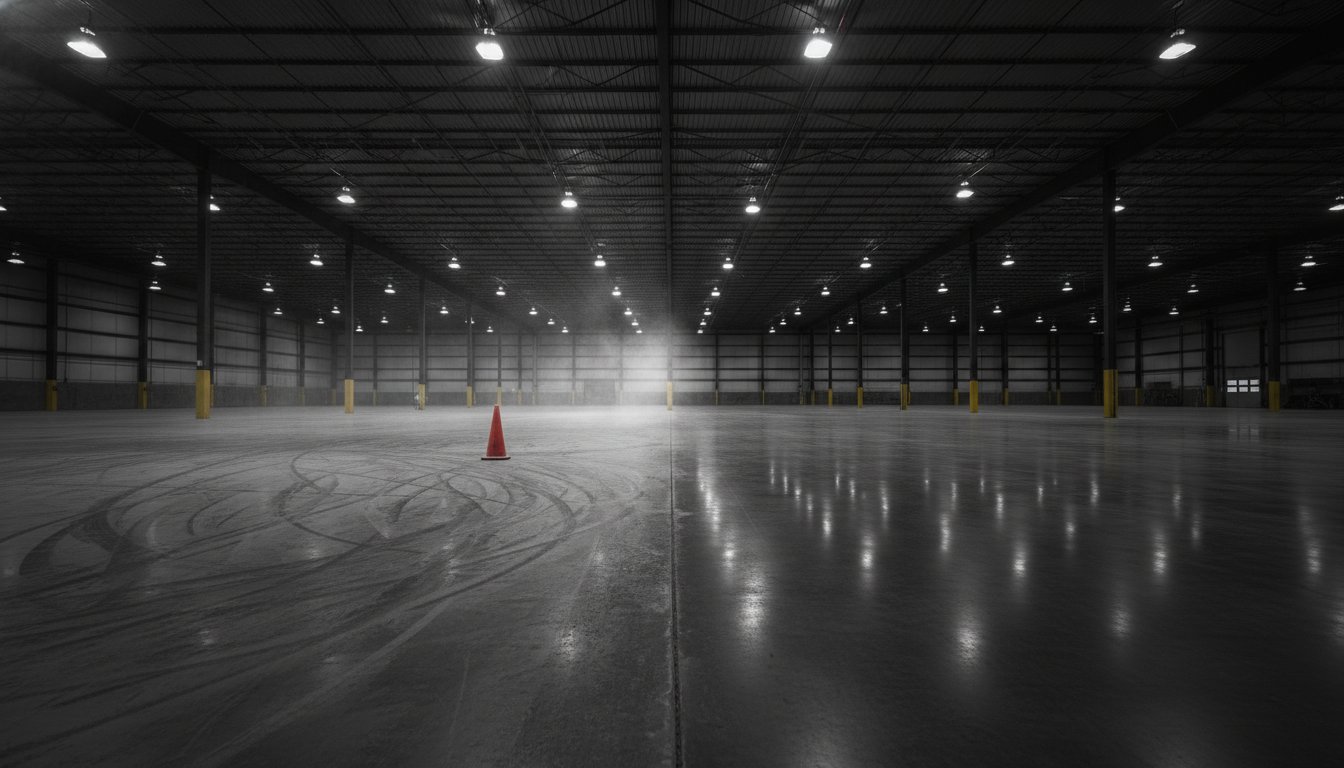
Commercial kitchens are the "Special Ops" environments of the flooring world. If your floor cannot withstand 400-degree grease spills, heavy equipment vibration, and 18-hour shifts, then your entire operation is on borrowed time. The commercial kitchen flooring installation timeline is more than just a schedule; it is a blueprint for professional survival. Many managers fall for the "24-Hour Myth," believing a high-performance coating can be applied and cooked on by the next morning. This shortcut is a dangerous gamble that often leads to catastrophic delamination. When a resinous bond fails because it was rushed, the coating peels away, trapping stagnant water and rotting your concrete from the inside out.
The relationship between material thickness and installation duration is absolute. A thin-film epoxy might cure quickly, but it lacks the thermal shock resistance required for a busy cook line. Professional-grade urethane cement, usually applied at a quarter-inch thickness, requires specific windows for outgassing and chemical bonding. While options like Sheet vinyl flooring are common in light-duty areas, they cannot match the seamless, industrial-strength protection of a poured system. Every hour added to your timeline is an investment in a decade of durability.
Health Codes and Professional Survival
If your floor develops micro-cracks or bubbles due to a rushed cure, then you have essentially built a five-star hotel for bacteria. Health inspectors in 2026 prioritize seamless transitions and hygiene. A floor that is "good enough" does not exist in a high-volume environment where grease and moisture are constant. Beyond sanitation, employee safety is a massive liability. We focus on achieving a DCOF of 0.50 or higher to ensure your staff stays upright during the dinner rush. A failed inspection or a slip-and-fall claim can cost far more than a few days of planned downtime.
The Cost of Cutting Corners
Analyzing the price of a three-day "express" install versus a proper five-day sequence reveals the true cost of impatience. A rushed floor will likely require a full, expensive replacement within twenty-four months. DIY kits are a death sentence for commercial concrete; they simply cannot bond deeply enough to handle industrial heat. Our blue-collar artisan mindset means we prioritize the integrity of the finish over the speed of the clock. We treat manual labor as a craft, ensuring every square foot is prepared with surgical precision. If you value your long-term revenue, then you must respect the chemistry of the cure.
Day-by-Day: The Typical 5-Day Installation Sequence
Managing a 2,000-square-foot facility requires a tactical approach to scheduling. Your commercial kitchen flooring installation timeline begins with the realization that Day 1 is the most disruptive phase of the project. It is loud, aggressive, and requires the complete removal of all mobile equipment. We don't just "rough up" the surface. We perform a deep mechanical grind to ensure your new floor becomes a permanent part of the slab. If you try to keep the prep area "partially open," then you are inviting dust and debris into your food prep zones. Total isolation is the only way to protect your kitchen's integrity.
Days 1-2: Mechanical Grinding and Moisture Testing
Mechanical grinding uses industrial diamonds to open the concrete's pores. This process creates the "profile" necessary for the resin to bite deep into the stone. During this phase, we conduct Moisture Vapor Transmission (MVT) testing. This is a non-negotiable anchor for professional survival. If we find high moisture levels, we must address them immediately with specialized primers to prevent future bubbling. This rigorous prep work ensures your facility meets FDA Food Code safety provisions for durable, non-absorbent, and easily cleanable surfaces. We also patch spalls and cracks during these first 48 hours to eliminate hidden breeding grounds for bacteria.
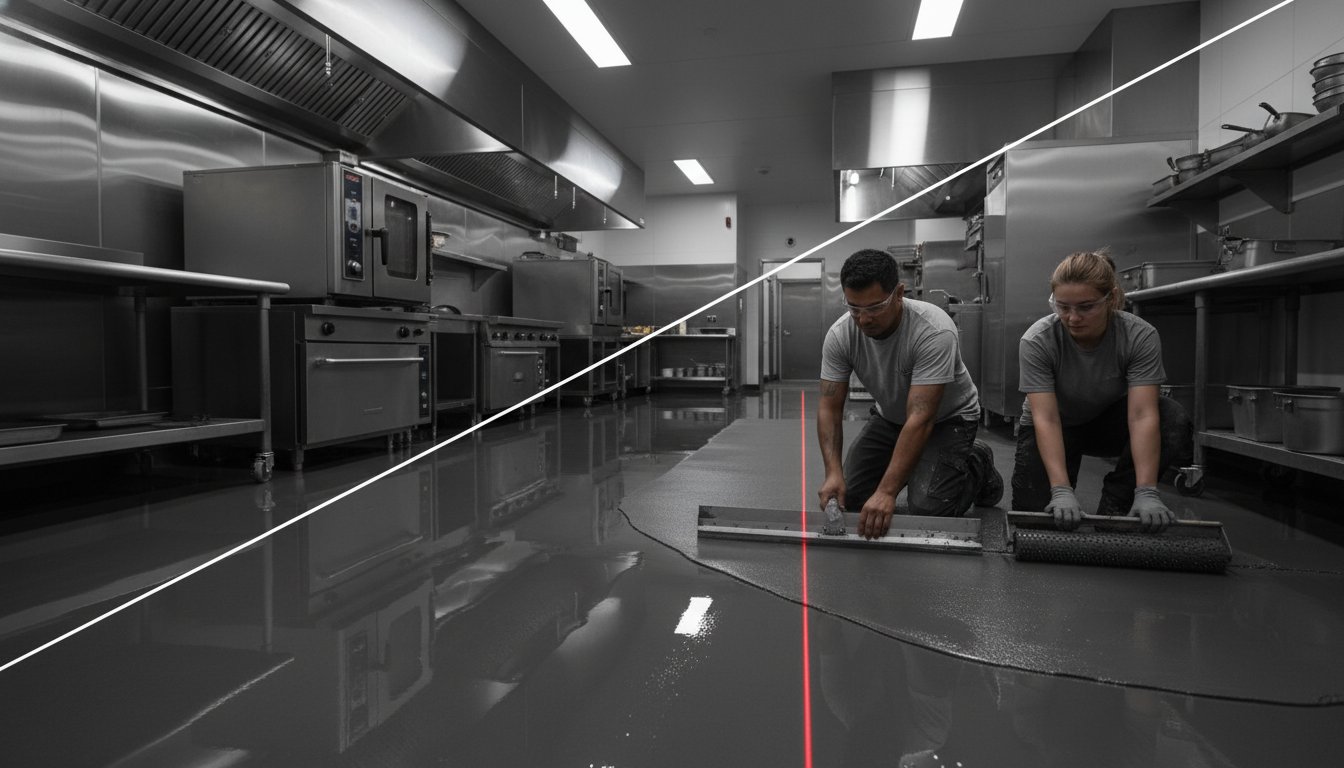
Days 3-5: Application, Topcoats, and Final Curing
Once the foundation is surgically clean, we apply the base coat. We broadcast specialized aggregate into the wet resin to provide the critical slip resistance your staff needs. On Day 4, we seal the system with a high-performance topcoat designed to withstand thermal shock and caustic cleaners. The "Cure Window" on Day 5 is your final hurdle. While the floor may feel dry, it is still chemically maturing. If you move heavy ovens or fire up the fryers too early, you risk permanent indentations. We treat this phase with the focus of a blue-collar artisan, ensuring the finish is perfect before you step foot on it.
A gallery-quality finish is the direct result of patience and precision. If you are ready to see how our commercial floor coatings can transform your workspace into a point of pride, then you must respect the five-day process. The final inspection should reveal a seamless, vibrant surface that looks as good as it performs. This is where hard manual labor meets artistic excellence.
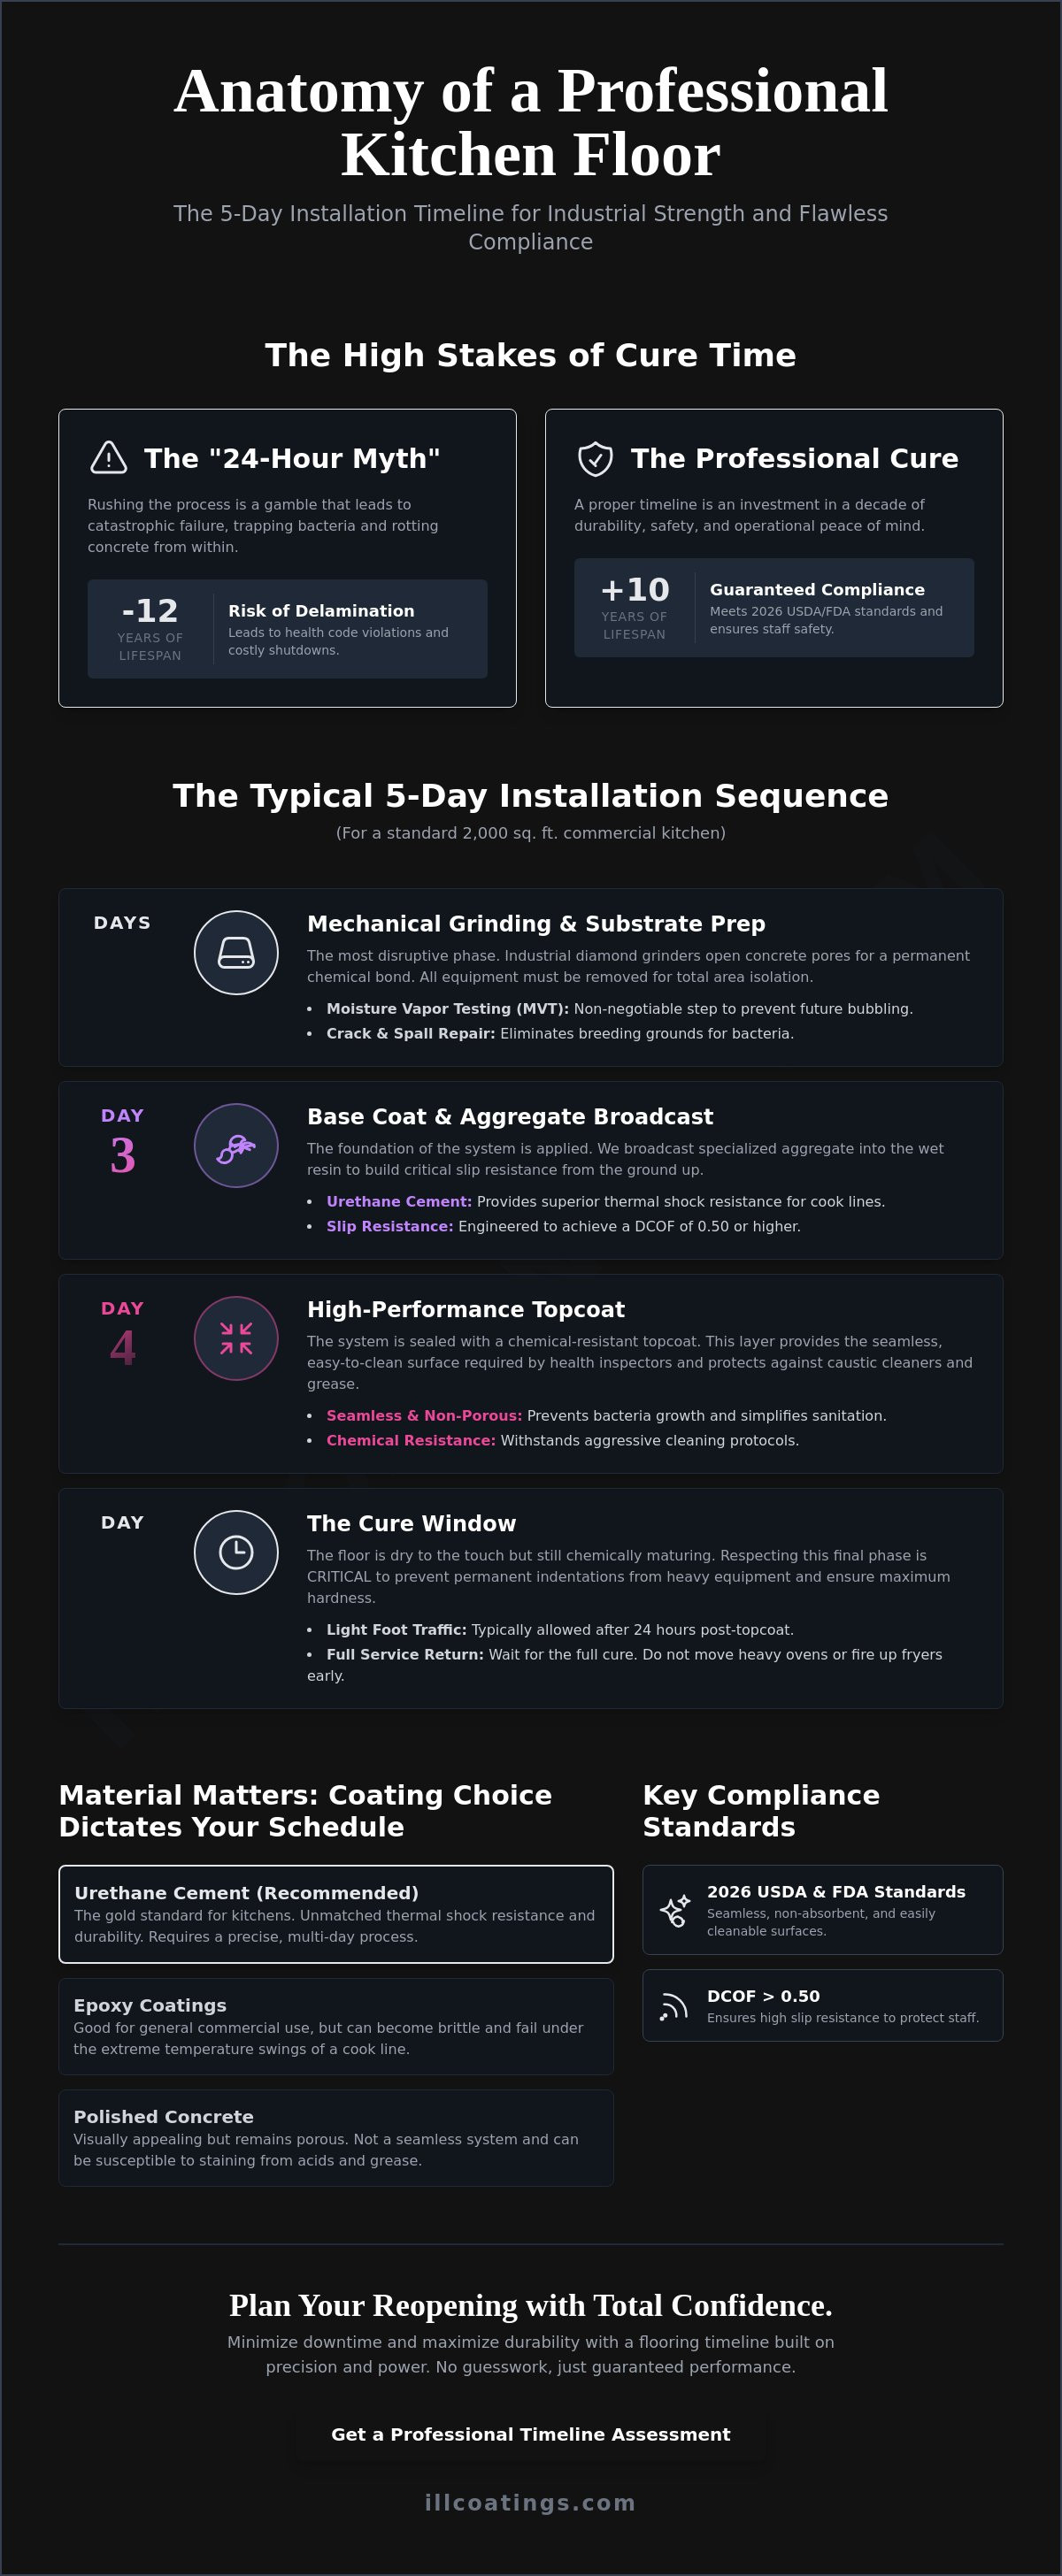
Material Matters: How Coating Choice Dictates Your Schedule
Your choice of material is the single most significant variable in your commercial kitchen flooring installation timeline. If you prioritize speed over chemistry, then you will likely face a delaminated floor before your first anniversary. While some contractors promise "fast-drying" adhesives to win a bid, these materials often lack the thermal shock resistance required for a professional cook line. A high-volume kitchen isn't a standard warehouse; it's an environment of extremes. The resin you choose must survive 200-degree washdowns and the heavy vibration of walk-in compressors without losing its bond to the slab.
The US climate also plays a hidden role in your project's duration. High humidity and fluctuating temperatures can turn a standard 12-hour cure into a 24-hour waiting game. We account for these environmental factors with the precision of a blue-collar artisan, adjusting our mixtures to ensure the chemical bond is perfect. Matching your menu to your material is equally vital. If your facility focuses on high-heat frying, then your needs differ wildly from a cold-storage distribution center. We treat the chemical interaction between your floor and your daily operations with the same respect a chef gives a complex reduction.
Urethane Cement: The Rapid Response Solution
Urethane cement is the industry standard for facilities that cannot afford long periods of downtime. It is a "rapid response" material because it can often be applied in a thicker, one-pass system that handles thermal shock in as little as 12 to 24 hours after the final coat. This material expands and contracts at a rate similar to the concrete slab itself. Because it's a low-VOC option, it is ideal for occupied buildings where odors could otherwise contaminate nearby food products or disrupt staff in adjacent offices. If you need a floor that is back in service by Monday morning, then urethane cement is your best tactical choice.
Epoxy and Polyaspartics: When to Use Them
Multi-layer epoxy systems are beautiful and incredibly durable, but they typically take longer to build. Each layer requires its own dedicated window for outgassing and curing, which can extend your schedule. We often reserve these for dry storage or customer-facing areas where aesthetics are the primary focus. To accelerate the return-to-service window, we can utilize polyaspartic topcoats. These high-performance finishes cure much faster than traditional epoxy, allowing for light foot traffic in a fraction of the time. While concrete polishing is an excellent, low-maintenance choice for front-of-house areas, it is rarely appropriate for the heavy grease exposure found in a kitchen's back-of-house.
Strategies to Minimize Operational Downtime
If your facility operates around the clock, then a total shutdown might feel like a deal-breaker for your bottom line. You can minimize the impact on your revenue by adopting a "Phase-by-Phase" approach. This strategy involves dividing your kitchen into logical zones, allowing us to grind and coat one section while your prep team continues limited operations in another. This requires surgical precision and airtight dust barriers, but it is a proven way to manage a commercial kitchen flooring installation timeline without losing every cent of your weekly profit. The success of this method depends on clear communication protocols between our coating crew and your kitchen staff.
You can shave hours off the first day by handling the heavy lifting before our trucks arrive. If we have to wait for a plumber to disconnect a steam kettle, then your timeline is already in jeopardy. We also recommend utilizing your facility's HVAC system and industrial dehumidifiers to stabilize the environment. Controlling the air quality isn't just about comfort; it's about chemistry. Lowering the humidity speeds up the outgassing process and ensures the resin reaches its peak hardness without delay. This proactive management turns a chaotic construction project into a controlled transformation.
Pre-Installation Checklist for Managers
Preparation is the foundation of professional excellence. To ensure a smooth start, follow these essential steps:
- Disconnect all gas, water, and electrical lines for mobile and stationary equipment.
- Ensure the work area has dedicated 220v power access for our industrial diamond grinders.
- Clear wide access paths for material transport and heavy machinery to move freely.
- Seal and protect all food-contact surfaces and sensitive electronics from fine concrete dust.
The 48-Hour 'Safe Zone' Post-Installation
There is a massive difference between a floor that is "dry to touch" and one that is "chemically cured." If you drag a 500-pound refrigerator across a 24-hour-old floor, then you risk ruining a massive investment. We enforce a strict 48-hour "Safe Zone" for heavy equipment and boiling water washdowns. During this window, the polymers are still cross-linking to reach their full industrial strength. Use this time for staff training on new cleaning protocols. High-performance floors require specific, non-caustic cleaners to maintain their slip resistance and visual brilliance. If you want a team that respects your schedule as much as your craft, then contact us for a professional floor coating consultation today to lock in your 2026 upgrade.
The Illuminated Coatings Promise: Precision and Power
Our family-owned stakes mean we never rush your floor. If our professional survival is tied to the quality of our work, then we have every incentive to ensure your bond is permanent and your finish is flawless. We don't just offer a construction service; we treat manual labor as a form of high-stakes craftsmanship. We understand that your commercial kitchen flooring installation timeline is a delicate balance between operational necessity and chemical reality. We manage this schedule with the focus of a specialist, ensuring that every hour spent on prep translates into years of industrial-strength performance.
We don't just apply coatings; we Illuminate your facility. We take pride in transforming a dull, dangerous, and grease-soaked kitchen into a brilliant point of professional pride. This transformation is not just about aesthetics. It's about providing the security of a long-standing, locally-rooted business structure that stands behind every square foot. From the first diamond grind to the final walkthrough, we guide you through the process with total transparency, ensuring you know exactly when your team can safely return to the line.
Craftsmanship Over Convenience
If you value the longevity of your business, then you cannot afford to trust a generalist with your kitchen floor. We prioritize craftsmanship over convenience, using only high-performance industrial coatings that meet the rigorous demands of 2026 health codes. We treat every commercial kitchen as a masterpiece in progress, balancing the need for surgical precision with the brute power of our industrial machinery. Our expert consultation process helps you choose the right system for your specific workflow, whether you are dealing with high-heat fryers or sub-zero walk-ins. We refuse to cut corners because a failed floor is a failure of our professional integrity.
Ready for a Transformation?
Getting an accurate timeline for your specific square footage requires more than a guess. While an over-the-phone quote might seem convenient, it lacks the technical depth of a professional site assessment. We need to see the condition of your slab, test for moisture, and identify potential bond-breakers before we commit to a schedule. This level of accountability is what separates a blue-collar artisan from a volume-based contractor. If you are ready to move from a state of operational uncertainty to total confidence, then it is time to take the next step. Schedule your commercial flooring consultation with Illuminated Coatings today and experience the difference that precision and power can make for your facility.
Secure Your Kitchen's Future With a Precision Install
Transforming your kitchen floor is a high-stakes investment that demands more than just a quick fix. If you prioritize the chemistry of the cure over a rushed opening, then you're building a foundation that will last for decades. We've explored how surgical mechanical grinding and strategic material selection are the cornerstones of a successful project. Mastering your specific commercial kitchen flooring installation timeline is the only way to ensure your facility remains USDA and FDA compliant while protecting your staff from dangerous slip-and-fall hazards.
As specialists in high-performance Vuba stone and industrial coatings, we bring a family-owned sense of accountability to every job site. We treat your concrete as a masterpiece because our professional survival depends on your satisfaction. If you're ready to turn a dull workspace into a point of professional pride, then we're ready to deliver the industrial brilliance your facility deserves. Our expertise in USDA and FDA compliant systems ensures your floor meets every safety standard without compromise.
Get a precise timeline for your kitchen flooring project with Illuminated Coatings and discover the power of a floor built to withstand the toughest environments. Your kitchen deserves a surface that works as hard as your team does every single shift.
Frequently Asked Questions
How long does it take to install epoxy in a commercial kitchen?
A standard commercial kitchen flooring installation timeline for epoxy typically spans three to five days. This includes the essential mechanical grinding, base coat application, and final topcoat sealing. If your facility has complex subfloor damage or high moisture levels, then the process may lean toward the five-day mark to ensure a permanent bond that lasts for a decade.
Can we install new flooring without moving all the kitchen equipment?
You must move all mobile equipment and disconnect stationary appliances to achieve a seamless, hygienic finish. If you leave heavy equipment in place, then you create seams where bacteria can thrive and the coating can eventually fail. A professional installation requires total access to the slab to ensure every square foot is properly prepared and protected against grease and heat.
How soon can staff walk on the new floor after installation?
Staff can usually walk on the new surface after 24 hours of curing. However, this window is for light foot traffic only and does not include dragging heavy equipment or using boiling water washdowns. If you want to avoid permanent indentations or scuffs, then you should wait the full 48 hours before resuming high-volume operations or moving heavy ovens back into place.
What is the fastest flooring option for a restaurant that can't close?
Urethane cement is the most efficient high-performance option for facilities with minimal downtime. It often allows for a one-pass application that can handle thermal shock and heavy traffic much faster than traditional multi-layer epoxy systems. When we pair this with polyaspartic topcoats, you can significantly compress your reopening schedule without sacrificing industrial durability or safety.
Does the kitchen temperature affect how long the coating takes to dry?
Kitchen temperature and humidity are critical factors that dictate the speed of the chemical reaction. If the air is too humid or the slab is too cold, then the resin will take significantly longer to reach its peak hardness. We often use industrial dehumidifiers and HVAC controls to stabilize the environment and keep your project on a predictable schedule regardless of the weather outside.
Why does my kitchen floor need to be grinded before the coating is applied?
Mechanical grinding is the only way to open the concrete's pores and create a profile for the resin to bite into. If you skip this step, then the coating is simply sitting on top of the stone rather than becoming a permanent part of it. This mechanical bond is what prevents the floor from peeling when exposed to heavy vibration and the extreme heat of a busy cook line.
Will the floor coating smell affect our food or customers?
We utilize low-VOC commercial floor coatings to minimize odors during the installation process. While some materials have a distinct chemical scent during the liquid application phase, proper ventilation and modern resin chemistry ensure that your food products and customers aren't impacted. These specialized systems are designed specifically for the sensitive and high-stakes environments of the food service industry.
What happens if we reopen the kitchen before the floor is fully cured?
Reopening too early is a recipe for catastrophic delamination and massive revenue loss. If the polymers haven't finished cross-linking, then the weight of your equipment and the heat from your line will cause the coating to bubble or peel away from the slab. This ruins your investment and often requires a complete, expensive strip-and-recoat process that doubles your total downtime and frustration.